If you suffering blue screen and Corrupted
data, crashes and other unexplained behavior, you will Suspicion a bout your ram.
because
Bad RAM is one of the most frustrating computer problems to have as
system instability and symptoms are
often random and hard to pin down.
One of the most recommended solution is to test your bad ram with one of the best ram testing programs MemTest86 .
The History of MemTest86
MemTest86
was originally developed by Chris Brady (BradyTech Inc) with a first release in
1994. However, it is interesting to note that some of the testing algorithms
used have been under development since 1981 and were previously implemented on
Dec PDP-11, VAX-11/780 and Cray XMP architectures. Since then, there have been
more than a dozen new versions released. Support for 64bit, new CPU
types, symmetrical multiprocessors and many other features have been added
during this period. MemTest86 was released as free open source (GPL) software.
Between
2002 – 2004 (during the time period of the MemTest86 V3.0 release) the code was
'forked' by Samuel Demeulemeester (now part of the French CanardPC publishing
group) into another version of the software calledMemTest86+. The naming was
unfortunate as it now leads to much confusion between users. Nevertheless,
bothMemtest86s subsequently continued to be developed.
The
original MemTest86 was continued to be developed across 2004 to 2013, with
multiple updates made - most notably the Version 4.0 release. In Feb 2013,
PassMark Software took over the maintenance of the MemTest86 project from Chris
The MemTest86 v4 project is still maintained and remains open source, for use on old machines with BIOS. However, from V5 with the latest release being 9.0 the software is being released under a proprietary license. Development on the MemTest86+ version seems to be discontinued as there have been minimal updates since 2013.
Why use MemTest86:
MemTest86 gives you some good Features to test your ram like:
·
13
different RAM testing algorithms - including row hammer fault detection.
·
All RAM
types supported (DDR2, DDR3, DDR4, SODIMM, XMP, ECC).
·
Self-booting
off USB or Network (PXE) boot, without needing DOS, Linux nor Windows.
·
Optimized
for UEFI-based x86/ARM systems.
·
Native
64-bit code (since version 5).
·
ECC
error detection & injection.
·
Secure
Boot verified – Code signed by Microsoft.
·
Graphical
interface with mouse input.
·
Save
logs and create customizable HTML reports.
·
Full
test automation via configuration file.
·
Support
for memory blacklisting in Windows (badmemorylist) and Linux (BADRAM).
·
Multi-language
support (Chinese, German, Russian, Spanish & more).
How you can use MemTest86:
First
you will find a program call ( ImageUSB )
includes in memtest86 it gives you an
easy option to directly you USB flash
drive, and install memtest86 on it.
Steps to install memtest86 on your usb flash
drive:
- Insert USB.
- Launch ImageUSB and
select the appropriate USB. (Be careful and select the correct drive!).
- Choose the Reformat USB drive option &
Reformat.
- You will be promted to confirm the
process, click Yes.
- Drive USB drive is reformatted.
Alternatively, you can use the
'Zero USB drive' option in ImageUSB, as outlined
below:
- Insert USB.
- Launch ImageUSB and
select the appropriate USB. (Be careful and select the correct drive!).
- Choose the Zero USB drive option &
Run.
- Drive MBR is now Zeroed. You will need to
reinsert the drive for Windows to recognize it and prompt for formatting
before you can use it again. A normal format will now recover the full
capacity of the USB drive.
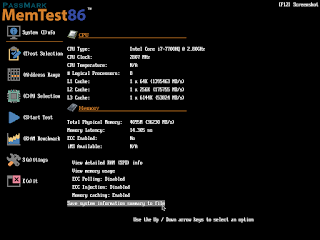
When MemTest86 boots, a splash
screen is displayed with a 10 second countdown timer which when expires,
automatically starts the memory tests with default settings. Pressing a key or
moving the mouse shall stop the timer. To configure the memory tests,
select Config and the main menu is displayed. The main menu
allows the user to customize the memory test settings such as the specific
tests to execute, address range to test and which CPU(s) are used in testing.
The Main Menu is structured as
follows:
- System Info - displays the hardware details of
the system
- Test Selection - specifies which tests to enable,
and how many passes to run
- Address Range - specifies the lower and upper
address memory limits to test
- CPU Selection - select between Single, Parallel,
Round Robin and Sequential modes
- Start - start executing the memory tests
- RAM Benchmark - performs benchmarking tests on
RAM, and graphs the results on a chart
- Settings - configure general MemTest86 settings such as language
selection and screen resolution
- Exit - exits MemTest86 and reboots the system.
Test Results
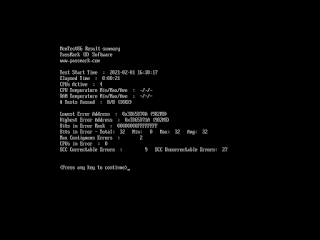
At the end of the test, a summary
of the test results is displayed, as shown in the following screenshot:
Lowest Error Address: The lowest address that where an error has been reported.Highest Error Address: The highest address that where an error has been reported.Bits in Error Mask: A mask of all bits that have been in error (hexadecimal).Bits in Error: Total bit in error for all error instances and the min, max and average bit in error of each individual occurrence.Max Contiguous Errors: The maximum of contiguous addresses with errors.CPUs in Error:List of CPU cores that detected memory errors.ECC Correctable/Uncorrectable Errors:The number of errors that have been corrected/uncorrected by ECC hardware.Test Errors:On the right hand side of the screen the number of errors for each test are displayed.
IF you found any errors on your ram like shown
in this image :
Then you must do the following :
Several operating systems allow
the user to pass in a blacklist of 'bad' memory ranges to block the
operating system from using or allocating memory in that range. This is useful
for cases where the RAM in the system fails predictably on the same set of
memory addresses. By masking known faulty addresses, the system may temporarily
be able to boot into the operating system to perform backup and additional
diagnostics, where it would otherwise crash during the boot process.
Note that masking faulty memory
addresses does not fix defective RAM, but provides a temporary workaround for
allowing the system to boot, especially in the case of soldered memory that
cannot be easily replaced. Faulty memory should always be replaced,
if possible.
Linux BadRAM
Most newer Linux kernels (eg.
Ubuntu 12.04 or newer) support BadRAM, which allow a blacklist of memory
address & mask patterns to be passed in as a GRUB2 boot-time parameter.
How to blacklist RAM regions
MemTest86
Pro (v9 or later) supports automatic
generation of BadRAM string patterns from detected errors in the HTML report,
that can be used directly in the GRUB2 configuration without needing to
manually calculate address/mask values by hand.
To enter the address ranges to
blacklist manually, do the following:
1.
Edit /etc/default/grub and
add the following line:
GRUB_BADRAM=addr,mask[,addr,mask...]
where the list of addr,mask pairs specify the memory range to
block using address bit matching
Eg. GRUB_BADRAM=0x7ddf0000,0xffffc000 shall exclude
the memory range 0x7DDF0000-0x7DDF4000
- Open and terminal and run the following
command
sudo update-grub
- Reboot the system
How to view blacklisted RAM regions
To view the memory regions that
have been blacklisted, do the following:
- Open and terminal and run the following
command
sudo cat /proc/iomem
...
7ddf0000-7ddf3fff
: RAM buffer
...
Memory ranges blacklisted by
BadRAM are marked as RAM buffer
Windows badmemorylist
For Windows Vista and later,
the blacklist of known 'bad' memory ranges can be passed in
via the Boot Configuration Data (BCD) system store. This is part of the Windows
Hardware Error Architecture (WHEA) which performs Predictive Failure Analysis
(PFA) for ECC memory.
How to blacklist RAM pages
MemTest86
Pro (v9 or later) supports automatic
generation of badmemorylist command strings from detected errors in
the HTML report, that can pasted directly in the Command Prompt without needing
to manually calculate page numbers by hand.
To enter the page numbers to
blacklist manually, do the following:
- Open the Command Prompt (as Administrator)
either from Windows or System Recovery options
- Run the following command to enable memory
blacklisting:
bcdedit /set {badmemory} badmemoryaccess no
- Run the following command to blacklist the
faulty page frame numbers (PFN):
bcdedit /set {badmemory} badmemorylist PFN1 [PFN2
PFN3 ...]
where the list of PFN values specify individual page numbers to
block
Eg. bcdedit /set {badmemory} badmemorylist 0xA1 0xB8 0xB9 shall
exclude the memory ranges 0xA1000-0xA1FFF, 0xB8000-0xB9FFF
Note:
Windows Memory Diagnostics can also overwrite or delete the entire PFN list
without notifying the user. And at least in some cases Windows Memory
Diagnostics might run as a background scheduled task in Windows.
How to view blacklisted RAM pages
To view the list of page numbers
that have been blacklisted, do the following:
- Open the Command Prompt (as Administrator)
either from Windows or System Recovery options
- Run the following command to display the
list of blacklisted pages:
bcdedit /enum {badmemory}
- Alternatively, you may use the RAMMap tool from Microsoft.
How to clear blacklisted RAM pages
To clear the list of page numbers
that have been blacklisted, do the following:
- Open the Command Prompt (as Administrator)
either from Windows or System Recovery options
- Run the following command to clear the
list of blacklisted pages:
bcdedit /deletevalue {badmemory} badmemorylist.
NOW let us go with memtest86 download


Comments
Post a Comment